Everybody is talking about NFTs these days. Non-fungible tokens, or NFTs for short, are pieces of data that live on the blockchain that can be used to verify ownership. It depends on the creator what they can be used for beyond that, some examples include granting access to special events or storing historical data on them. If you want to jump in and learn how to make your own, this tutorial is for you. I’ll be teaching you how to put a picture and description about yourself on the Solana blockchain.
Why Solana
- It’s fast
- Block time is only 400 milliseconds, compared to 12-14 seconds on Ethereum
- It’s cheap
- At the time of writing this, the average transaction cost is a mere $0.00025
- The maximum amount a transaction will ever cost is $0.01
What is Metaplex/Candy Machine?
Metaplex is self-described as
A protocol built on top of Solana that allows:
- Creating/Minting Non-Fungible Tokens;
- Starting A variety of auctions for primary/secondary sales;
- and Visualizing NFTs in a standard way across wallets and applications.
Candy Machine is a part of Metaplex. It’s a powerful NFT distribution program that allows users to easily create and distribute NFTs with just a tiny amount of configuration.
Prerequisites
I’m assuming you have a basic knowledge of the command line and git, and that you have Node.js installed.
If you’re on an M1 Mac such as myself, you’re going to need to install a few things via brew
brew install pkg-config cairo pango libpng jpeg giflib librsvg
Getting Started
Alright, let’s get going! First we’re going to clone Metaplex’s CLI.
git clone https://github.com/metaplex-foundation/metaplex.git
When that finishes cd into the metaplex directory and run this command
yarn install --cwd js
This will run yarn install inside of the js directory. Alternatively you can run these commands
cd js
yarn install
cd ..
Now we need to install ts-node. To put it simply, this let’s us run TypeScript files with Node. You can use any package manager such as npm or yarn but I’ll be using pnpm
pnpm add -g ts-node
Next let’s setup an alias so we don’t have to run a long command every time we want to run Candy Machine. Inside of the metaplex directory, run the following:
alias candy-machine="ts-node js/packages/cli/src/candy-machine-v2-cli.ts"
To make sure it worked, run candy-machine --version. You should see 0.0.2

Obtaining a Solana Wallet and SOL
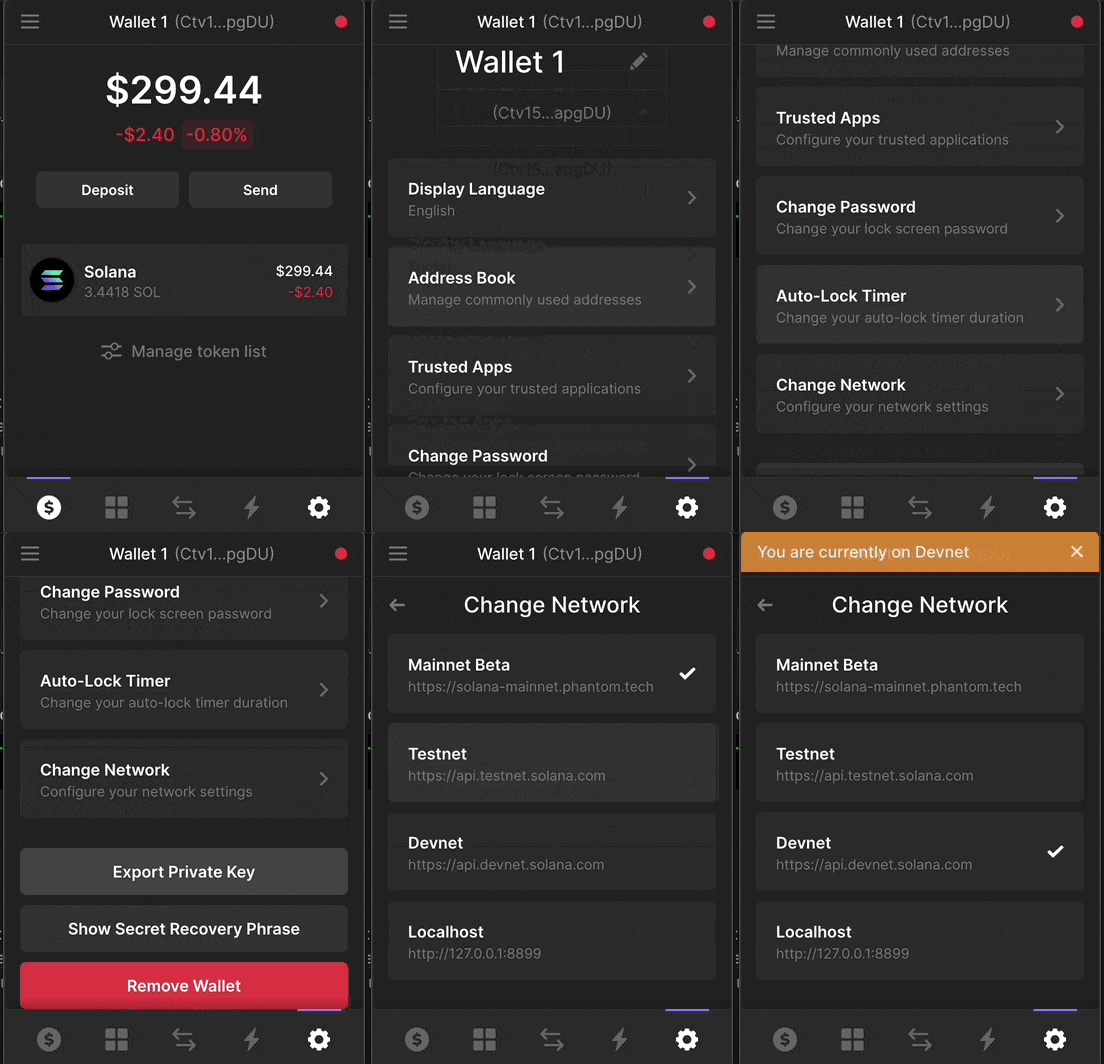
We’re going to need a wallet to deploy and hold our NFT, so let’s get one. The one I’ll be using for this tutorial is called Phantom, you can download it here. Once you have your wallet setup, go to the settings tab, scroll down, click ‘Change Network’, and select Devnet.

Once you’ve done this, click at the top where it says ‘Wallet 1’ (or whatever you named your wallet). This will copy your wallet address to your clipboard, which we’ll need for the next step.
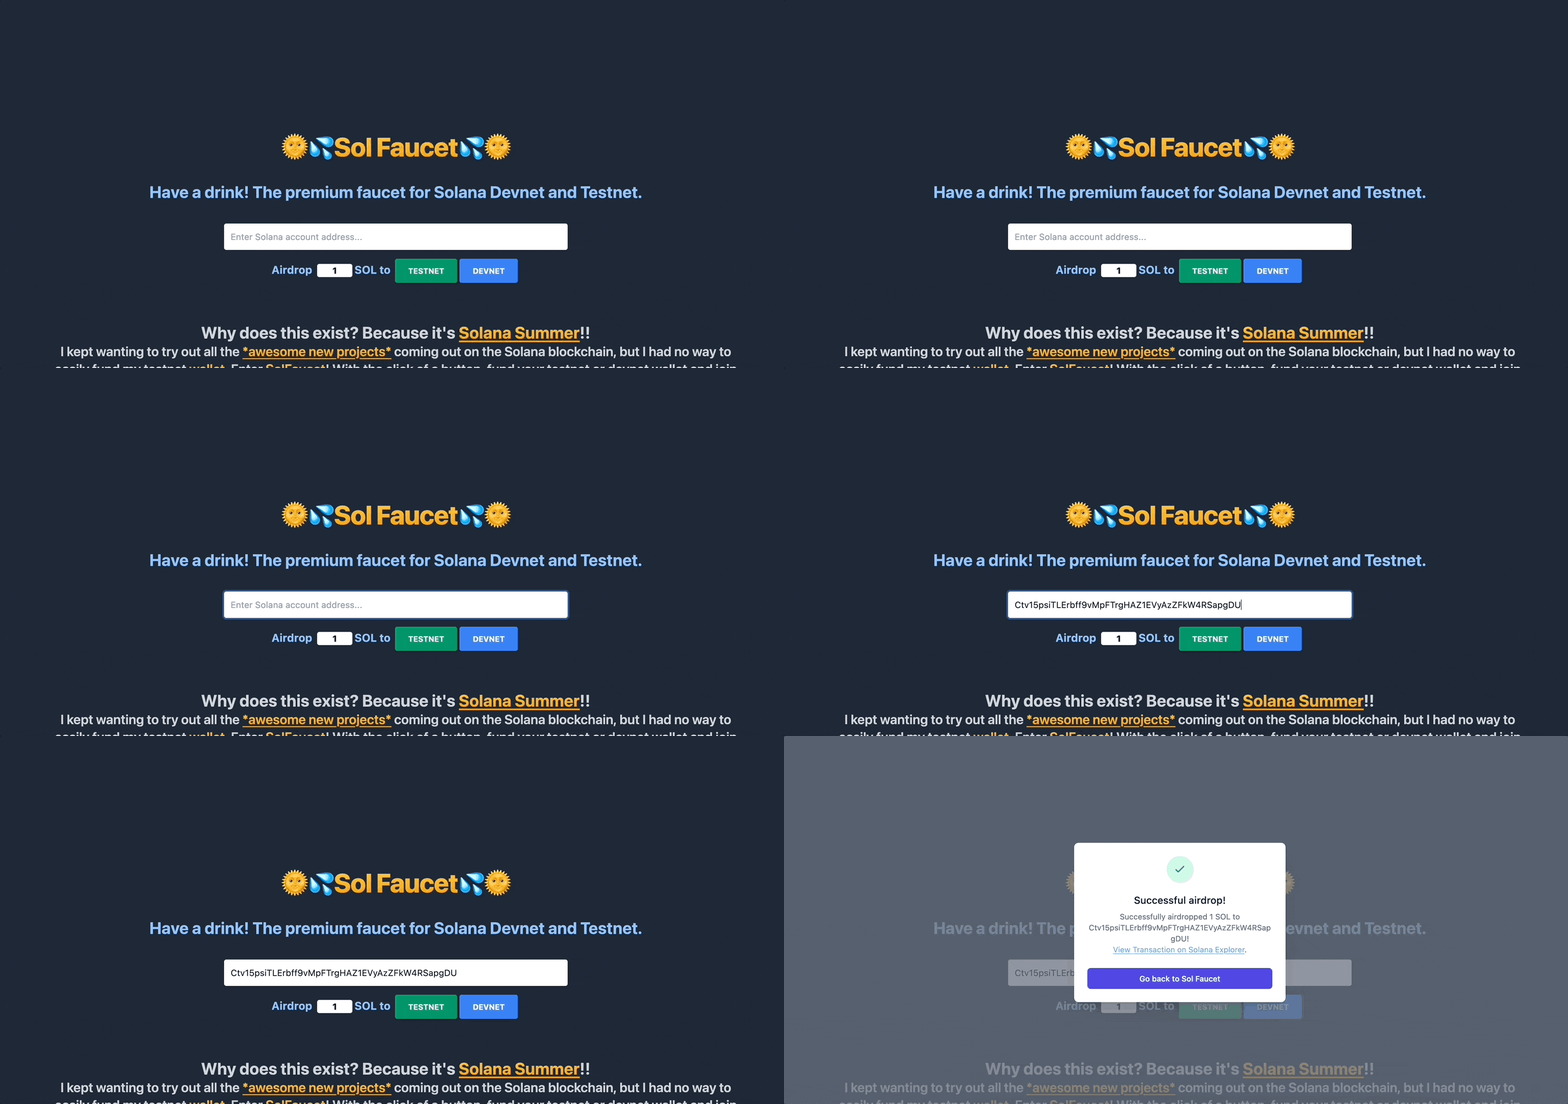
Now you may be thinking to yourself, do I have to pay to make my own NFT? Well, yes, but since we’re on the Devnet we won’t have to use real SOL (Solana’s native cryptocurrency, the same way Ethereum has ETH) because the Devnet is made for testing. If you want to deploy onto the Mainnet where SOL has real value, you’ll have to pay. Since Solana has such low fees however, it will be super cheap to do so. To obtain Devnet SOL, visit https://solfaucet.com/, paste in your address, and click ‘Devnet’. You can change the amount of SOL that will be sent, but we won’t need more than 1 for this tutorial.

Great! Now when we get to the part where we deploy our NFT, we’ll have the funds to do so.
Configuration
Before we make the actual NFT itself, we’re going to need to configure Candy Machine. Create a file called config.json inside of the metaplex directory we cloned from GitHub earlier.
Inside of that, paste the following. Don’t worry, I’ll explain everything 😃
{
    "price": 0.01,
    "number": 1,
    "gatekeeper": null,
    "solTreasuryAccount": "<YOUR WALLET ADDRESS>",
    "splTokenAccount": null,
    "splToken": null,
    "goLiveDate": "3 May 2022 00:00:00 GMT",
    "endSettings": null,
    "whitelistMintSettings": null,
    "hiddenSettings": null,
    "storage": "arweave-sol",
    "ipfsInfuraProjectId": null,
    "ipfsInfuraSecret": null,
    "nftStorageKey": null,
    "awsS3Bucket": null,
    "noRetainAuthority": false,
    "noMutable": false
}
What does all this mean? Well, I’ll only be going over things that matter for us, as I don’t want to confuse anyone. If you’re curious what the other things mean, check out the table on the CandyMachine docs
price - The amount of SOL it will cost to mint
number - The amount of NFTs
solTreasuryAccount - Wallet to send money made from minting
goLiveDate - What date and time to start the mint
Preparing the NFT
Now onto the good stuff. Since we’re putting ourselves on the blockchain, I’m going to grab a picture of myself. You can use whatever picture you want 😊
Save this as 0.png (or .jpg, whatever format your image is) inside a new directory called assets inside of the Metaplex repository we cloned earlier.
Metadata
We’re going to need a metadata file. This file provides info about our NFT such as the name and file type. Inside of the assets directory, create a new file called 0.json Inside of that file, paste the following
{
  "name": "<YOUR NAME>",
  "symbol": "<SYMBOL>",
  "description": "<DESCRIPTION>"
  "image": "0.jpg",
  "attributes": [
    {
      "trait_type": "<TRAIT NAME>",
      "value": "<TRAIT VALUE>"
    }
  ],
  "properties": {
    "creators": [
      {
        "address": "<YOUR WALLET ADDRESS>",
        "share": 100
      }
    ],
    "files": [{ "uri": "0.jpg", "type": "image/jpg" }]
  }
}
Here’s what all of this means.
name - The name of your NFT
symbol - The symbol of your NFT, I just used my initials.
description - The description of your NFT, I wrote a quick blurb about myself
image - The image associated with your NFT
attributes - Traits your NFT has. Feel free to add more or remove the field altogether
creators - The person/people who created the NFT/art. You can add more!
address- Wallet address of one of the creators
share - How much of the mint cost to send to this creator
files - Array of files associated with the NFT. In our case it’s just one.
Remember to change .png to .jpg or whatever file type you used if you didn’t use a PNG file!
If you need some inspiration, here’s what my file looks like.
{
  "name": "Jordan Baron",
  "symbol": "JB",
  "description": "18 year-old web developer from Virginia",
  "image": "0.jpg",
  "attributes": [
    {
      "trait_type": "age",
      "value": 18
    }
  ],
  "properties": {
    "creators": [
      {
        "address": "Ctv15psiTLErbff9vMpFTrgHAZ1EVyAzZFkW4RSapgDU",
        "share": 100
      }
    ],
    "files": [{ "uri": "0.jpg", "type": "image/jpg" }]
  }
}
Verifying the Assets
Before we upload the file to the blockchain, we’re going to need to make sure everything is correct! In your terminal, run the following.
candy-machine verify_assets ./assets
You should see output similar to the following

If you have any error, comment below and I’ll do my best to help you 😊
Uploading to the Blockchain
To publish our NFT we need our private key. A private key is what allows us to sign transactions. Do not ever give this to anyone. If you do, they’ll have full access to your account. Candy Machine is completely safe to use as it never stores it anywhere.
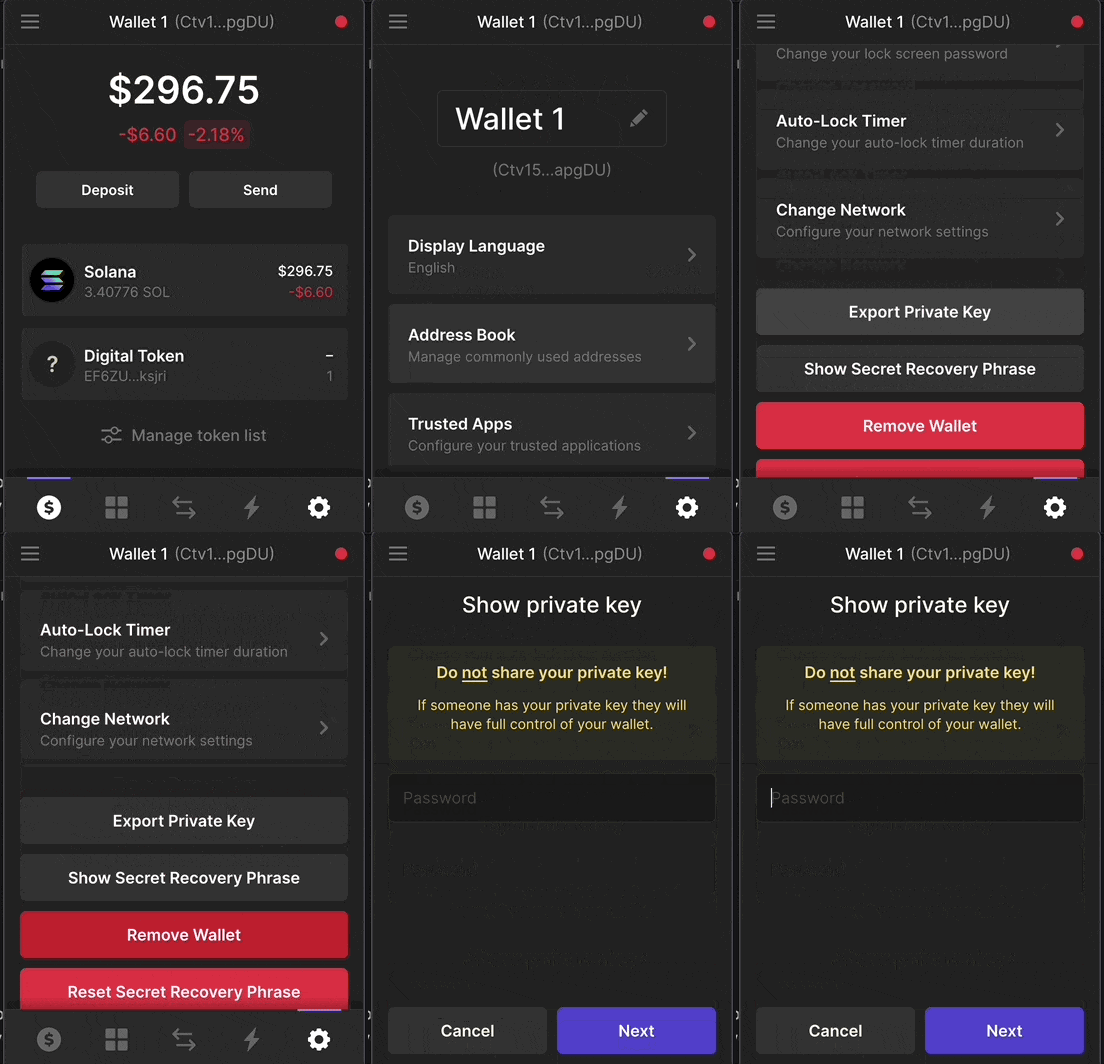
To obtain your private key, open Phantom, go to settings, scroll down, and click ‘Export Private Key’. It will prompt you for your password. Enter it, then copy your private key.

Now let’s upload our NFT! Run the following command, making sure to replace <YOUR_PRIVATE_KEY> with your actual private key.
candy-machine upload -e devnet -k <YOUR_PRIVATE_KEY> -cp config.json ./assets
This command uploads to the devnet (-e option) using your private key (-k option) and the config.json file (-cp option), using assets from the assets folder.
Running that command will give you a bunch of output. At the end of the output you should see something similar to this

Sweet, you are now officially on the blockchain! Just a few more steps and you’ll be able to see yourself in your Solana wallet.
Minting your NFT
Before we actually mint the NFT we just created, let’s verify that it was successfully uploaded.
candy-machine verify_upload -e devnet -k <YOUR_WALLET_KEY> -c temp
The command options all should look similar except -c. This option is where we specify a cache file. By default, Candy Machine will create it with the name temp. It hold information about our NFT such as the metadata URI.
Running this command should produce some output and at the end you should see the text ready to deploy!

If you see this, then great! Only one more step to go.
Minting
Finally, the moment you’ve been waiting for. Let’s mint our NFT!
candy-machine mint_one_token -e devnet -k <YOUR_WALLET_KEY> -c temp
This command is the same as the one we just used to verify our assets, except instead of verify_upload we’re doing mint_one_token.
The output of this command should end with mint_one_token finished followed by a random string

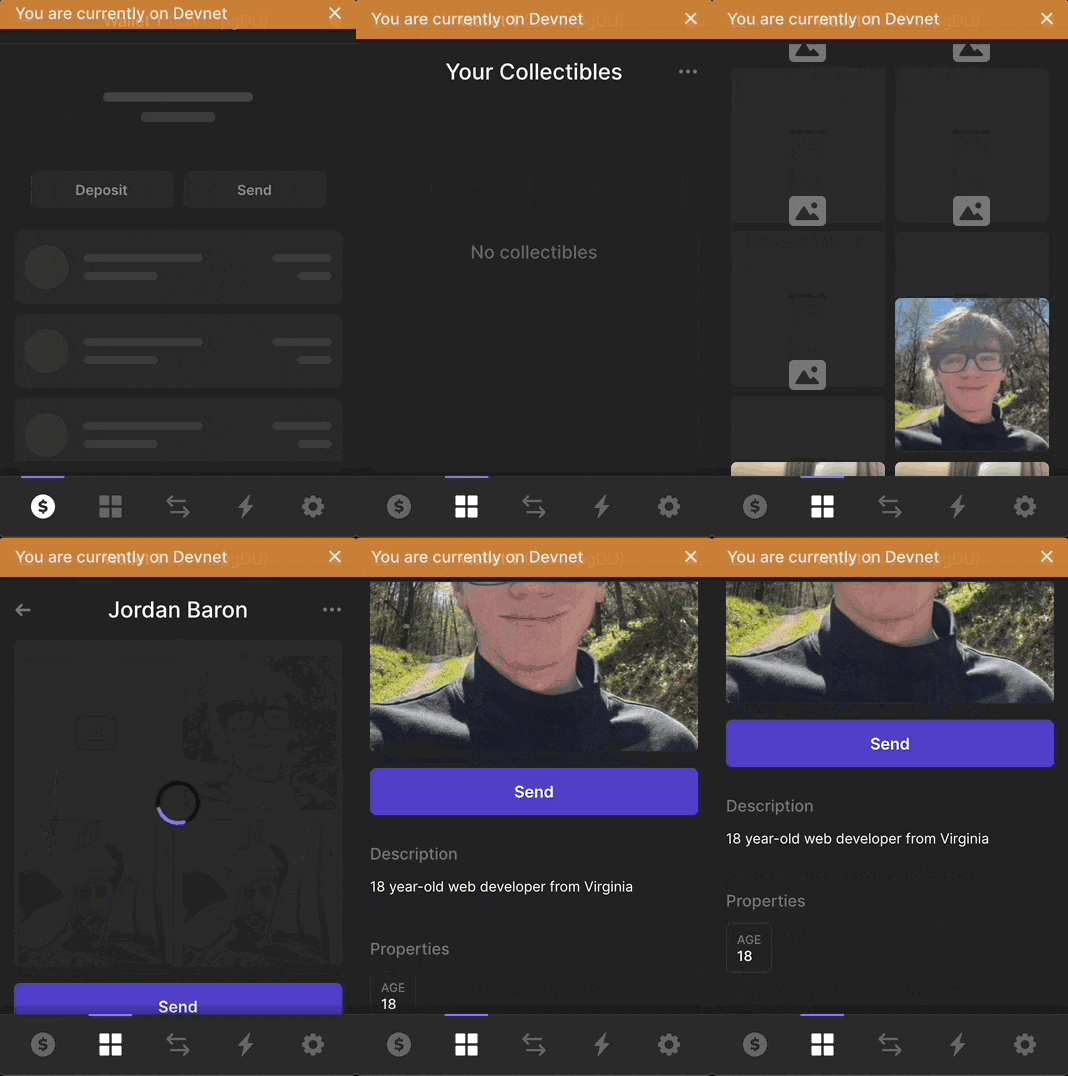
Now, open up Phantom, go the the ‘Collectibles’ tab (the four squares) and you should see your NFT!

Outro
That’s it! Thank you so much for reading, feel free to check out my Twitter and website to keep up to date with me. Candy Machine also has a prebuilt UI that allows you to mint your NFT through a React-based web app, so if you’d like to see a tutorial on that leave a comment below! 😊✌️
